Computer Controlled Cutting
Engraving icon
 |
LEVEL: |  |
|---|---|---|
| SKILLS: |  |
|
| TIME: |  |
|
| MACHINE: |  |
|
| SOFTWARE: | FUSION360 |
| TOOLS. | ||||||||||||||
|---|---|---|---|---|---|---|---|---|---|---|---|---|---|---|
|
|
|
|
|
|
|||||||||
| BOM: | |
|---|---|
| component name | link |
| component | link |
| component | link |
| component | link |
| component | link |
| component | link |
| component | link |
| component | link |
| component | link |
1. SECTION 1: Drawing "continuous line" icon with Inkscape
1.1 Download and install software
Intro about Inkscape (TO DO):
1.1 Engraving
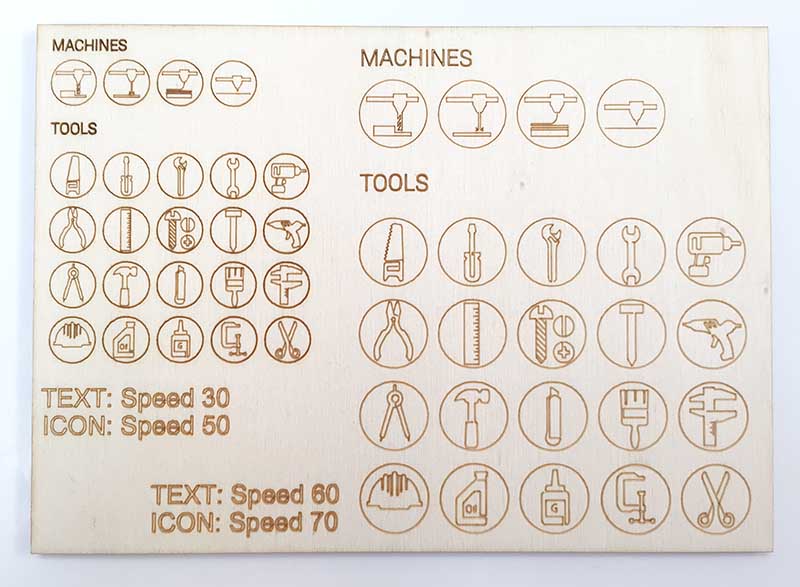
I reproduced the file in two different sizes:
In the first (the smallest) the icons are 10 mm in diameter. In this file I managed the vector engraving with two different parameters:
Speed 30%, Power 100%, PPI 500 for engraving edges and text - green layer - and Speed 50%, Power 100%, PPI 500 for engraving pictograms - red layer -.
In the second file the icons are 15 mm in diameter and in this case I tried to increase the speed of vector engraving using 60% for the text and 70% for the pictograms.
I'm very happy for this result because the icons maintain good legibility even from very small, the laser allows us to get very high details that printed on paper would be lost.
If you want to try also the icons are available, in .dxf versio by pressing the button below.